
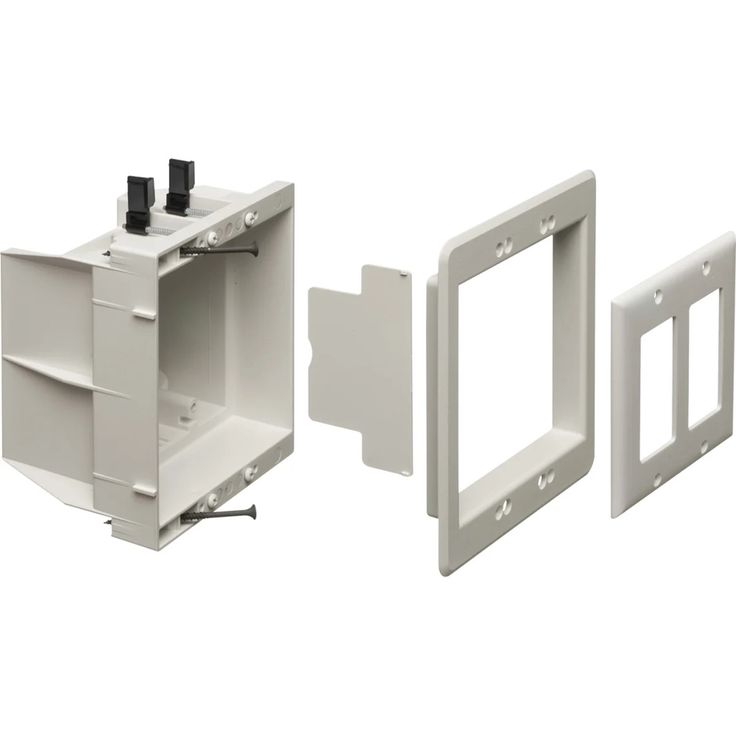
In the case of the ultimate entertainment set up, aesthetics and functionality are two together. AV recessed wall box is a game-changer to any person who wishes to simplify their audio-visual experience without compromising the style of a clean and clutter-free environment. Days of entangled wires and ugly cables that destroy your well-designed space are past. Not only does this new invention do wonders to your viewing satisfaction, but it is also a way of bringing a sense of elegance to any room.
It can be setting up a home theater, an upgrade of your living room, or a mere clean up of that media center, knowing how to install an AV recessed wall box can prove to be the difference. It is time to explore this all-encompassing guide in order to turn your space into a fun and easy one!
Benefits of Using an AV Recessed Wall Box
AV recessed wall box will reshape your living space giving it a tidy and orderly appearance. It removes the mess of visible cables and equipment, and permits a smooth aesthetic.
Safety is also increased by this solution. You can minimize trip hazards by hiding wires in the wall and provide a kid and pet friendly environment.
Besides, such boxes enhance audio and video. The closer the positioning devices are to your screen or speakers the less signal is lost due to the long cable runs.
The other strength is that it is versatile. An AV recessed wall box can fit any configuration with ease whether it is the establishment of a home theater or just connecting different devices in the living room.
Another essential advantage is that they can be installed in various types of walls: drywall, concrete, or others; thus, it can be used in any form of project. This flexibility will make your entertainment system maximize benefits with no loss of style or functionality.
Factors to Consider Before Installation
You have to analyze your space before you indulge yourself in installing a recessed media box. The type of wall is very important; drywall is the best option and brick or concrete can be used by using more tools.
Then, there is cable management. Design the paths along which the cables will be installed and the methods of their hiding. This will protect your headaches in the future.
Location matters too. Consider the screen size and the availability of plugging device. Positioning has implications on aesthetic and functionality.
In addition, there is a requirement of check power supply. Make sure that an electrical point is close to you so that you do not have to spend more time in setting it up.
Check on local building codes or regulations of low-voltage installations. Compliance will save you hassles in future and will make sure that you are safe in all aspects of your home theater experience.
Step-by-Step Guide to Installing an AV Recessed Wall Box
First prepare your supplies: a stud finder, a drill, a drywall saw, and a screwdriver. Find the studs in the wall so that you can identify the best position to install the recessed media box.
Indicate where you will cut using pencil. Use the template with your AV recessed wall box, and it will tell you what to do in terms of dimensions. Waste no time in cutting along those lines with your drywall saw.
Then put the box in the hole you have made. Make certain it is flat and firmly fixed to the wall frame. Depending on the model you are using, you might be required to use screws or brackets.
Now it’s time for wiring! Plug all cables carefully as per manufacturers instructions. Before putting any surplus cable back to the wall, make sure it is neat and orderly.
Install the faceplate of your AV recessed wall box. Before turning your devices on again, make sure that all things are in order and working well.
Troubleshooting Common Issues
Problems may occur when fitting recessed media box. Inadequate cablespace is one of the problems. Make sure that the wall cavity is not too shallow that all the required wires cannot be installed without bending and crimping.
The other most common issue is that of connectivity. When you have the devices that are not operating correctly then make sure all the connections are safe. The loose cords may cause low performance and loss of signal periodsically.
In some cases, you can find warm equipment next to the box. Poor ventilation is the cause of this problem in many cases. Adding small vents or changing placement can help to improve airflow.
In case you are having audio or video latency, this may be caused by any other electronics around. Arrange equipment and have a moderate spacing between them to ensure maximum performance.
Tips for Maintaining Your AV Recessed Wall Box
In order to make your recessed media box last and be useful, it is important to maintain it on a regular basis. Begin by examining the box every now and then in order to spot any form of wear or damage. Check by presence of frayed wires, loose connections or cracks in the housing.
Cleaning is also crucial. There can be the accumulation of dust and debris to the inside and around the AV recessed wall box over time. Wipe surfaces down softly with a soft cloth making sure that no opening is blocked to allow air to pass through.
Monitor the related devices too. In case performance is problematic (such as audio dropouts or connection problems), it may be useful to look into your connections inside the recessed media box itself.
Labeling cables: It is worth considering doing this. Such a simple step will make it far easier to troubleshoot in case something will go wrong in the future.
These tips will assist in making sure that your AV recessed wall box will continue to be dependable and efficient in the years to come.


Leave a comment